Use this guide to build, schedule, perform, complete, export, and troubleshoot Inspections. It covers the exact controls and blocked states on desktop web, mobile web, and the native app.
Start here
- I create inspection programs: Understand the lifecycle → Create or import a draft → Build sections and items.
- I standardize inspections across the company: Build organization inspection templates → Create custom inspection responses.
- I perform field inspections: Schedule and start → Record results and observations → Complete.
- I review records: Find inspections → Export a PDF.
- Something is missing or blocked: Start with Troubleshooting Inspections.
Common task recipes
- Build a checklist every project can use: In Organization Settings → Inspection Templates, select Add Template and build the sections and items once. In any project, pick that template in the Create Draft Inspection dialog.
- Answer with your own words instead of check / X / N/A: In Organization Settings → Inspection Responses, add a response set such as Yes / No, then choose it as an item's Response type.
- Repeat an inspection on this project: Duplicate last occurrence's inspection instead of starting over.
- Seed a new project: Import inspection structures from another project. Item results, observations, and item attachments are left behind.
- Perform the field walk: Move the inspection to Inspecting, record a result on each item — Passed, Failed, N/A, or one of the item's custom responses — and add notes and photos.
- Issue a record: Complete the inspection and export its PDF.
Understand access and lifecycle
Understand how Inspections work
Every inspection moves through the same four statuses, and the one it's in decides what you can do to it.
Draft → Scheduled → Inspecting → Complete
An inspection holds an overview, trades, attachments, ordered sections, and ordered checklist items. Item results are recorded while the overall inspection is Inspecting — that one rule explains most of what you can and can't do at any given moment.
Each status answers a different question about where the inspection stands.
- Draft: Build the structure and overview.
- Scheduled: Set the inspection date and prepare for field work.
- Inspecting: Record a result on each checklist item. Every result counts as a pass, a fail, or not applicable, even when the item uses your organization's own response wording.
- Complete: Preserve the finished state for review and export.
If you have inspection write access, you can move to the next status or jump to any other one. Sending an inspection backward reopens it — a cancelled walk returns to Scheduled, a finished one returns to Inspecting for a correction. The status only ever shows where the inspection stands now, so once you've moved it backward, the activity log is the only place the real order of events survives.
Permissions, visibility, and platform availability
Inspections splits access three ways, and holding one permission without the others is normal rather than a sign something is broken.
- View inspections controls access to non-draft inspection records.
- Create new draft inspections controls creating drafts and seeing the draft group.
- Create new inspections, make changes to existing inspections controls structure, status, results, observations, duplication, rename, and deletion.
Administrators, managers, and employees receive these permissions by default. Your project may be configured differently, so check with your administrator before assuming a record has gone missing.
Note: Draft access and general view access are separate. Someone can be able to view every active inspection and still not see a single draft.
Once you have the access, everything in Inspections works on a phone. Browsing, recording results, writing notes, changing status, importing, duplicating, and exporting the PDF are all available on desktop web, mobile web, and the app.
- By default the result controls are three icon buttons, not words: a check for Passed, an X for Failed, and an N/A glyph for Not Applicable. An item that uses a custom response set shows its responses as labeled buttons instead, laid out two to a row on a phone. Either way they're taller on a phone so they're easier to hit with a glove on.
- Building a long checklist works on a phone but is miserable there. Do structure work at a desk and save the phone for the walk.
- On desktop, the create control is a Draft Inspection button with a chevron beside it holding Import from Project. In the app it's a Draft button whose menu holds New Draft Inspection and Import from Project.
Troubleshooting Inspections
Nearly everything that looks broken in Inspections is one of three things: a permission you don't have, a status that disables the control you're reaching for, or an import behaving exactly as designed. Find your symptom and work through the checks in order.
A draft is missing
Confirm you have Create new draft inspections. Drafts are shown separately from active inspections, and general inspection view access doesn't reveal them.
Pass, Fail, and N/A are disabled
They aren't greyed out — outside Inspecting they're not drawn at all. An item that already has a result shows a Passed, Failed, or Not Applicable badge in their place — or the chosen response's own label, for items with a custom response set — and an item with no result shows nothing. So a checklist that looks empty and unclickable usually means the inspection hasn't been started yet.
Move it to Inspecting and confirm you have Create new inspections, make changes to existing inspections. You need both.
Imported observations or photos are missing
That's the design rather than a failure. Import copies inspection structure, sections, and items as new drafts, and intentionally leaves item results, observations, and item attachments behind.
The wrong people or date appear
Check the inspection overview — inspected-by user, inspection date, trades, and description all live there. Correct the overview before you export.
Export is missing
Export to PDF sits in the inspection's ⋯ menu. Confirm you have View inspections, and if the inspection or its attachments are still syncing, wait and retry.
Status changed unexpectedly
Anyone with write access can choose statuses from the status menu, including earlier states. Review the activity area and confirm the intended current status.
The template picker or Response type is missing
Both only appear once your organization has something to pick. The template menu in Create Draft Inspection shows up when at least one template exists in Organization Settings → Inspection Templates, and Response type shows up on an item when at least one response set exists in Inspection Responses. An archived response set isn't offered for new choices. If the templates exist and you still don't see the menu, confirm you have View inspections.
Plan and build
Understand the inspection lifecycle
The status on an inspection tells everyone where it stands: writing the checklist, waiting on a scheduled walk, recording results in the field, or holding a finished record. Knowing what each status is for keeps you from completing work nobody has actually checked.
Prepare your sections and checklist wording while the inspection is in Draft. Nothing is expected of anyone else yet, so this is the cheap moment to get the wording right. Set the date and the responsible inspector before you move it to Scheduled.
Move to Inspecting when you're ready to enter results. That's the status where item results are recorded, so an inspection sitting in Scheduled with no Pass and Fail controls on screen isn't broken — it just hasn't started yet.
Move to Complete after you review unresolved failures and the supporting evidence. Completing is where the record stops being a working document and becomes the thing you export.
Note: An Inspection is different from an inspection entry in a Daily Log. Use this workflow when you need a reusable, structured checklist with its own lifecycle and PDF.
Why can't I mark items Passed or Failed yet?
Item results are recorded while the overall inspection is Inspecting. Move the inspection into that status, confirm you have inspection write access, and the controls appear.
What does moving an inspection backward do?
It reopens the inspection, which is genuinely useful when a walk gets cancelled or a result needs correcting. Just know the status only shows where things stand now — once you've moved backward, the activity log is the only record of what happened in what order.
Match the status to the work in front of you and the controls you need are the ones on screen.
Build organization inspection templates
When every job runs the same framing, pre-pour, or fire-stopping inspection, build it once as an organization inspection template. Any project can then start a draft from it instead of retyping the checklist or importing a whole project's worth of inspections.
- Open Organization Settings and, under Field, choose Inspection Templates.
- Select Add Template. The Add Inspection Template dialog asks only for a title.
- Save. The template editor opens.
- Under Overview, adjust the Title and add a Description if the inspection needs instructions or scope.
- Select Add Section, name it for an area or system, then use Add Item to write each check.
- Choose a Response type for any item that should use your own answers instead of the default Check / X / N/A. That picker only appears once your organization has a response set — see Create custom inspection responses.
- Use each section's and item's actions menu to Move Up, Move Down, or delete it.
Changes save automatically as you type. The one exception is the title: Title is required. Changes are not saved until it has one.
The library list shows each template's title, how many sections and items it has, and when it last changed. Only roles with Update organization-level settings — Admin by default — see Add Template and the delete column, or can change a template; anyone else who opens it sees it read-only.
A template is copied into the project at the moment someone starts a draft from it. Editing the template later changes the next inspection started from it, not the ones that already exist. Deleting a template works the same way, and the confirmation says so outright: inspections already created from it won't change. There's no restore for a deleted template, so rebuild it if you remove one by mistake.
Pro Tip: Write template items as observable pass criteria. A vague template doesn't just confuse one walk; it confuses every project that starts from it.
How is a template different from Import from Project?
A template is one inspection you choose by name, maintained centrally. Import from Project copies every inspection in another project at once. Use templates for your company standard and import when you're cloning a specific job's whole program.
Does a template carry trades, dates, or attachments?
No. It carries the title, description, sections, items, and each item's response type. Trades, the inspection date, the inspected-by user, and attachments get filled in on the project's draft.
Build the standard once and every project's first draft starts from the same checklist.
Create custom inspection responses
Not every check reads naturally as a check mark or an X. "Is the guardrail at 42 inches?" wants Yes and No; a housekeeping walk might want Good, Needs Attention, and Unsafe. A response set gives inspectors those words while the inspection still knows which answers pass and which fail.
- Open Organization Settings and, under Field, choose Inspection Responses.
- Open Actions and choose Add Response Set.
- Enter a Name, such as Yes / No.
- Under Responses, enter each answer and pick what it Counts as: Pass, Fail, or Not applicable. Use Add Response for another one; a set holds from one to five.
- Select Add Response Set to save.
Then put it to work. When you add or edit an inspection item — in a project or in an organization template — choose the set under Response type. Leave it on Check / X / N/A for the default icons.
The Counts as choice is what everything downstream reads. An answer that counts as Fail opens the notes sheet the same way the X does, and the pass rate, the index card counts, and the PDF all treat it as a failure. The PDF prints the answer's own label, so the record reads "No" rather than "Failed."
Note: Changing an item's Response type clears any result already recorded on it. Pick the response type while the inspection is a draft, not halfway through the walk.
To retire a set, use the archive control on its row. The confirmation explains that inspection items already using it keep it; it just stops being offered for new choices. Turn on Show Archived under Actions to find it again and unarchive it. Response sets are archived, not deleted.
Can different items on the same inspection use different responses?
Yes. Response type is set per item, so a single checklist can mix Yes / No questions with the default check / X / N/A.
Set up the words your inspectors actually say, and the results still roll up into pass rates you can compare.
Create, import, or duplicate an inspection
You have three ways to start an inspection, and the one you pick decides how much retyping you avoid and how much stale evidence you drag along. Every route lands you in a Draft, so there's room to check the result before anyone walks it.
Create a draft
- Open Inspections.
- Select Draft Inspection. In the app, select Draft and then New Draft Inspection.
- In the Create Draft Inspection dialog, choose a template from the menu above the title, or leave it on Blank inspection. The menu only appears once your organization has inspection templates.
- Enter a title. Picking a template fills in its title if you haven't typed one yet.
- Save the draft.
A blank draft starts empty. A draft started from a template arrives with the template's description, sections, items, and response types already in place. Either way, the date, trades, and inspected-by user get filled in afterward, on the draft's overview.
Starting blank makes sense for a one-off check or the first inspection of a new type. If you're about to retype something your company, this project, or another one has already been through, a template or one of the next two routes is faster.
Import structures from another project
- Select the chevron beside Draft Inspection, or the Draft button in the app.
- Choose Import from Project. The Import Inspection Structure dialog opens.
- Select the source project.
- Select Import.
This brings over every inspection in the source project, not a selection, so point it at a project whose checklists you actually want wholesale. Each arrives as a new Draft carrying its title, description, trades, sections, and items.
What doesn't come across is the previous project's evidence: item results, observations, and item attachments are all left behind, which is the point — you're taking the checklist, not the findings.
Note: Overview attachments are copied, even though the dialog's wording suggests no attachments come along. If the source inspection had a spec excerpt or a site map attached at the inspection level, check whether it still applies before you schedule the copy.
Duplicate one inspection
Open an inspection's action menu and choose Duplicate Inspection. You get a Draft with the same title, description, trades, and checklist, dated today.
The results don't come with it. Item pass/fail marks, observations, and item attachments all start clean, and the inspected-by user is cleared so you can assign whoever is walking it this time. Overview attachments do carry over.
Before you schedule the copy, give the title a distinguishing date or area — duplicating a recurring inspection five times leaves you with five identically named records otherwise.
Should I import or duplicate?
Import when you're seeding a project and want another project's checklists wholesale. Duplicate when this project already contains the inspection you want to run again. Start from a template when your company keeps a standard version of the inspection in Inspection Templates.
Do photos and results come along with a copy?
No, and that's deliberate. Item results, observations, and item attachments stay with the original either way. Overview attachments do carry over, so give those a read before the copy goes out.
A minute spent choosing the right starting point saves an afternoon of retyping, and keeps last month's findings out of this month's record.
Build the inspection structure
The order of your checklist is the order someone walks the building. Build the sections and items while the inspection is a draft so the inspector reads straight down the page instead of doubling back to find the next check.
- Open a draft.
- Complete the overview: title, description, inspection date, trades, inspected-by user, and general attachments.
- Select Add Section.
- Name the section for an area or system.
- Add checklist items with clear pass criteria. If your organization has response sets, choose each item's Response type; otherwise items use Check / X / N/A.
- Move sections and items up or down to match field sequence.
- Remove unused items or sections.
Write each item as something the inspector can observe. Firestopping is complete at rated penetrations gives a clear pass or fail; Firestopping leaves the field guessing what passing meant, and you find out months later that two people guessed differently.
Pro Tip: Name sections after the areas or systems your team already talks about — the walk then sequences itself, and the exported PDF reads like the route someone actually took.
How specific should a checklist item be?
Specific enough that two inspectors would agree on the result. If a reasonable person could mark the same condition Passed and another could mark it Failed, split the item or rewrite it.
What about checks that won't apply on every walk?
Leave them in the structure. The inspector can mark them N/A in the field, which keeps the checklist consistent from one occurrence to the next.
Build it once in the right order and every future run of this inspection inherits that sequence.
Find and open inspections
Open Inspections to find a record — a draft you're still writing, tonight's walk, or last month's finished report. The index keeps drafts, active work, and completed inspections apart so you aren't scrolling through history to reach the one that's still open.
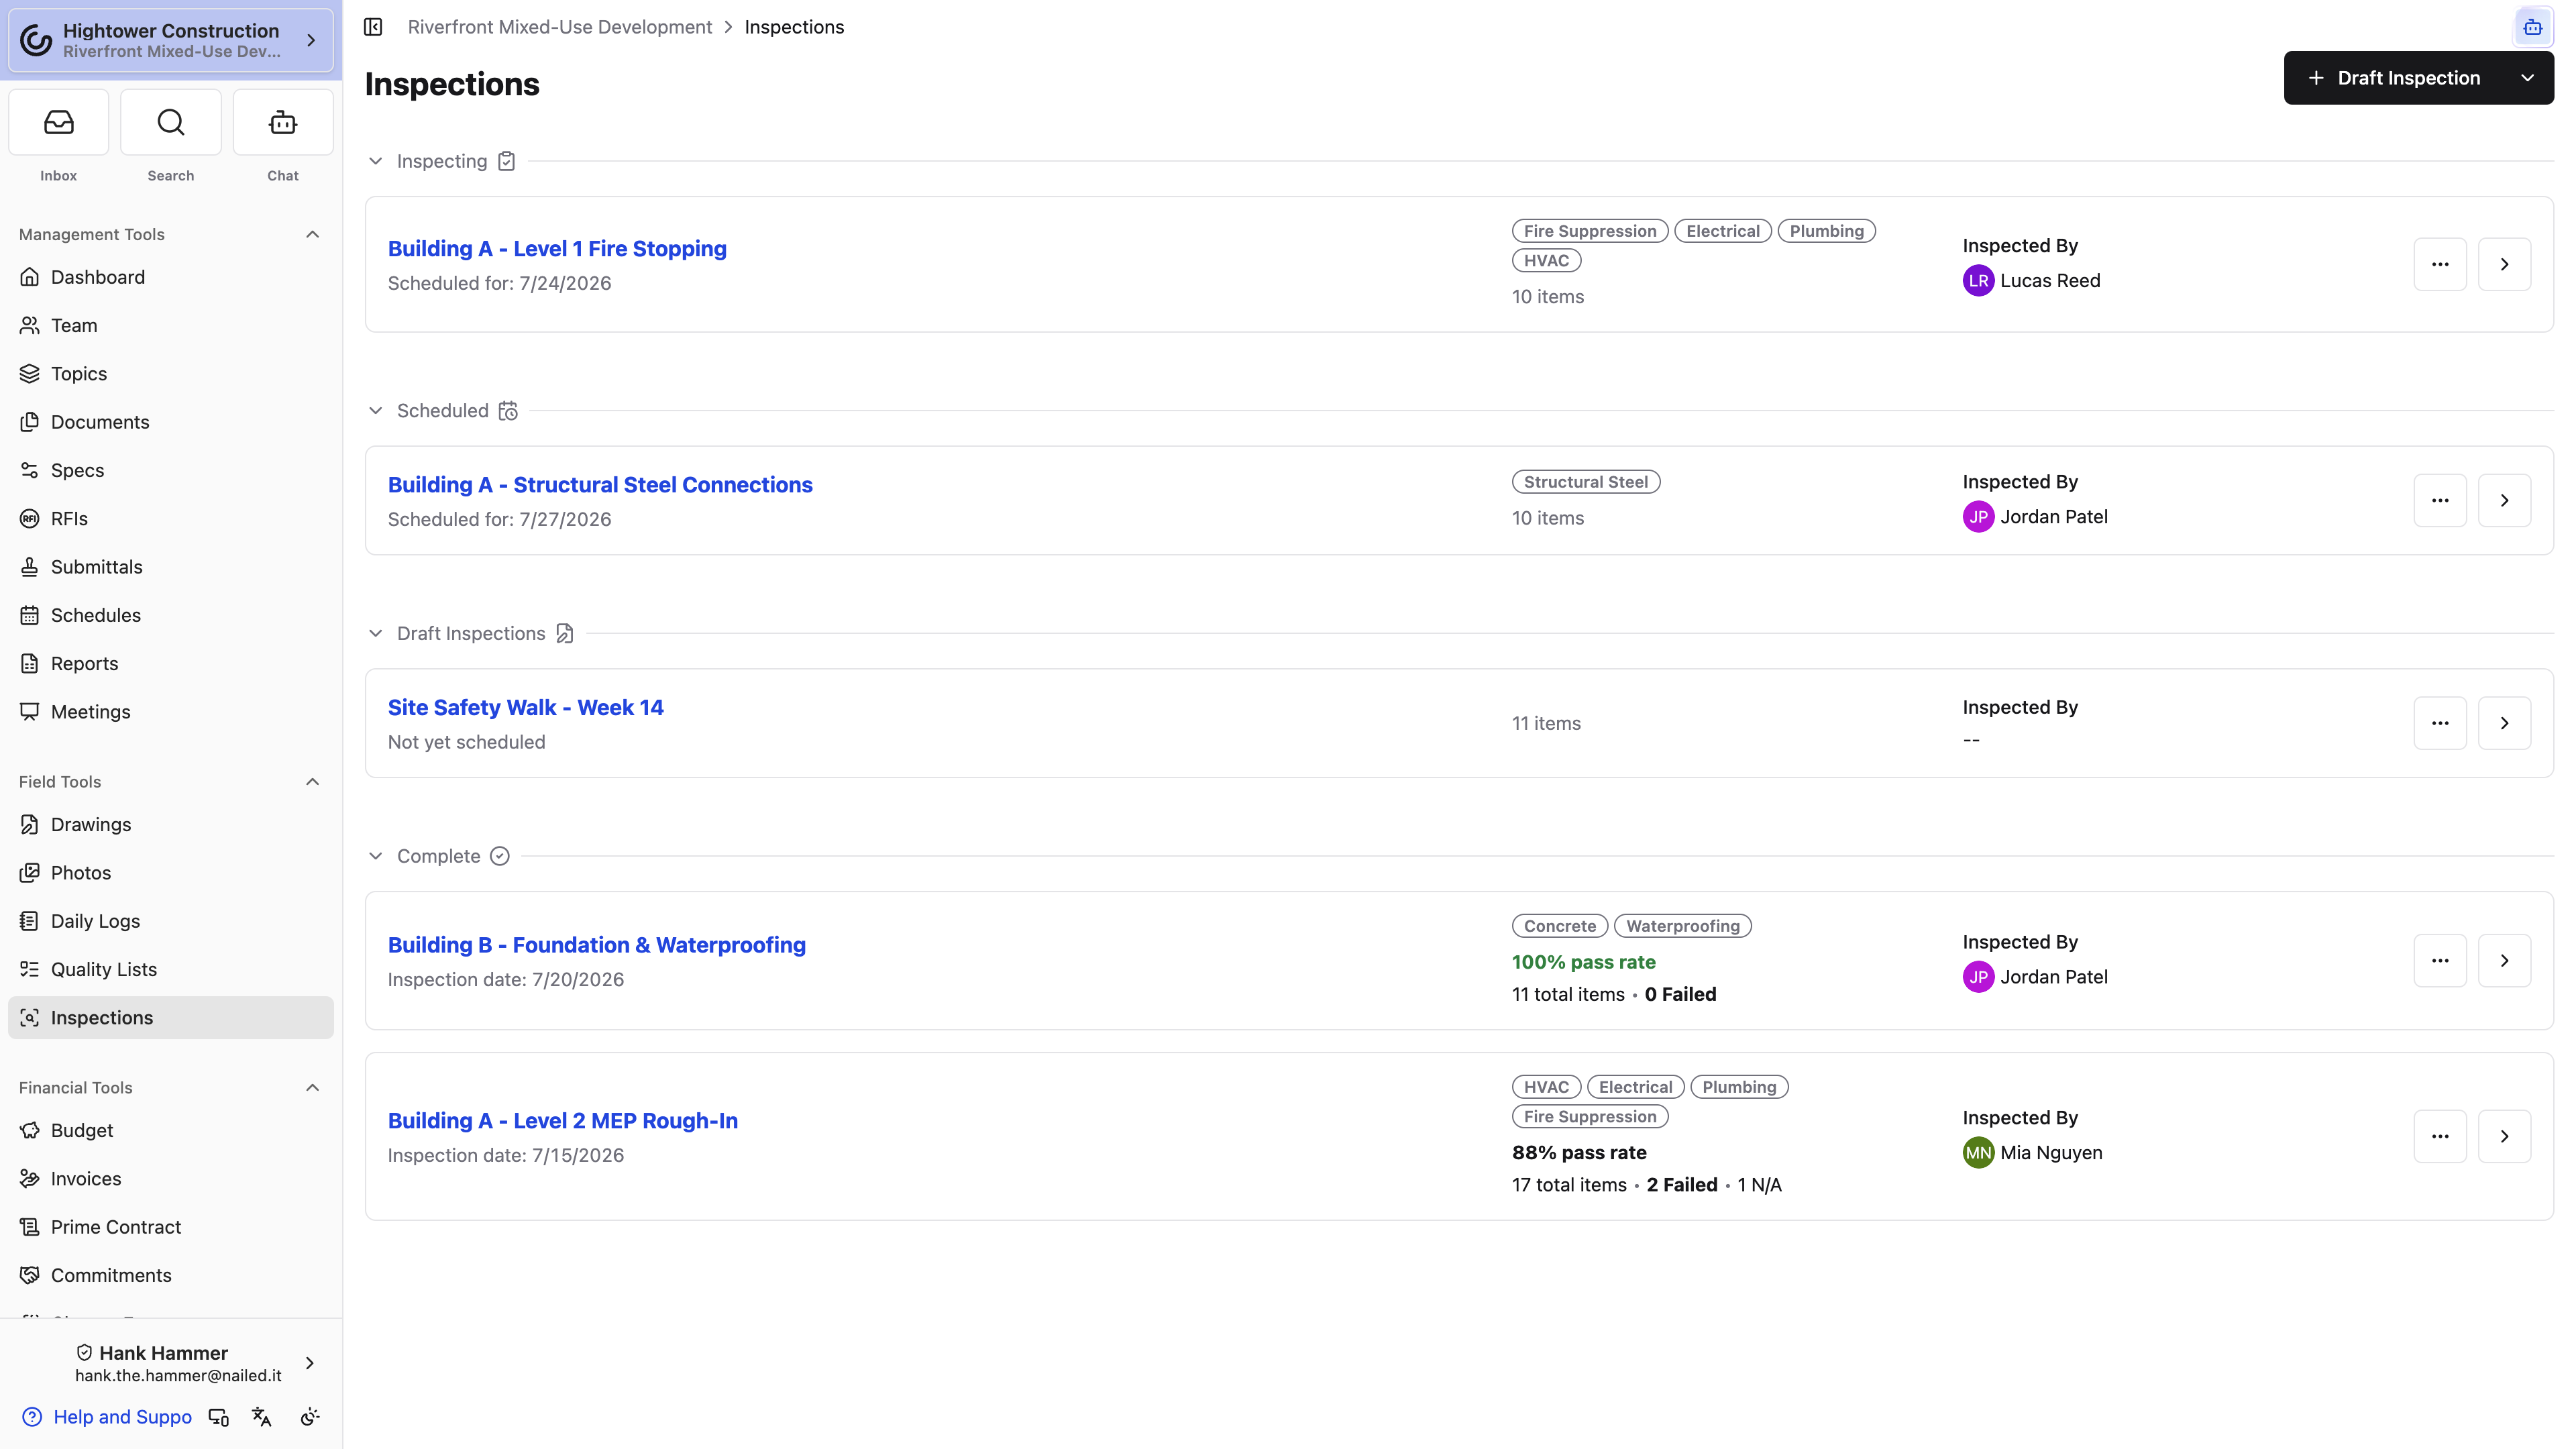
Inspection cards show the title, status, date, inspector, and trade context — enough to tell two similar inspections apart without opening either one. If you have draft permission, you can see drafts too. Open a record when you need its overview, sections, item results, attachments, or activity.
Once an inspection is complete, its card reports a pass rate, the total item count, the number failed, and the number marked N/A. That's enough to scan a column of finished inspections and see which need follow-up without opening any of them. The rate turns red below 90%.
Read that pass rate carefully, because of what sits in the bottom half of it. We divide passed items by every item except the ones marked N/A — which means items you left blank count against you. A twenty-item inspection with eighteen passes and two checks nobody ever marked reports 90%, not 100%. Marking a check Not Applicable — or choosing a custom response that counts as not applicable — removes it from the math entirely; leaving it blank does not.
Why don't I see any drafts?
Draft visibility is its own permission. Ask your administrator to check Create new draft inspections; general inspection view access doesn't include the draft group.
Does an N/A item count against the pass rate?
No. An item marked Not Applicable comes out of both halves, so it never lowers the rate. A blank item is different — it stays in the denominator and pulls the rate down as though it had failed. Finish the list before you complete the inspection.
Scan the index once and you know which inspections are waiting on you and which finished ones need follow-up.
Inspect and report
Schedule and start an inspection
Move the record into field work once the checklist, the date, and the responsible inspector are ready. Scheduled says the walk is set; Inspecting is the status that actually lets you record results, so start it when you're on site.
- Open the draft.
- Confirm the inspection date and inspected-by user.
- Select Schedule Inspection.
- At the field event, select Start Inspecting.
- Work through the checklist in order.
Step 2 isn't busywork. The inspected-by user and the inspection date both print on the exported PDF, and a wrong name or date is the most common reason someone has to correct the overview and export a second time.
The status menu isn't a one-way ratchet. Any status can be selected from it at any time, so a cancelled walk can go back to Scheduled and a completed record can return to Inspecting for a correction. That flexibility is deliberate, but it does mean nothing stops you from jumping to Complete before results are entered — so don't, or the inspection will report a pass rate it hasn't earned.
Can I go back to Scheduled after starting?
Yes. Any status can be selected from the status menu at any time, so a cancelled walk can return to Scheduled without any special handling.
Pass, Fail, and N/A are greyed out. What's wrong?
They're not greyed out — outside Inspecting the buttons aren't rendered, so an unstarted checklist looks inert rather than disabled. The inspection has to be in Inspecting and you need Create new inspections, make changes to existing inspections. Both, not either.
Start it this way and the record carries the right date and the right name before the first item is marked.
Record item results, observations, and attachments
This is the walk itself. Record a result for each item and keep the evidence beside the check it supports, so the finished record explains itself to someone who wasn't standing there with you.
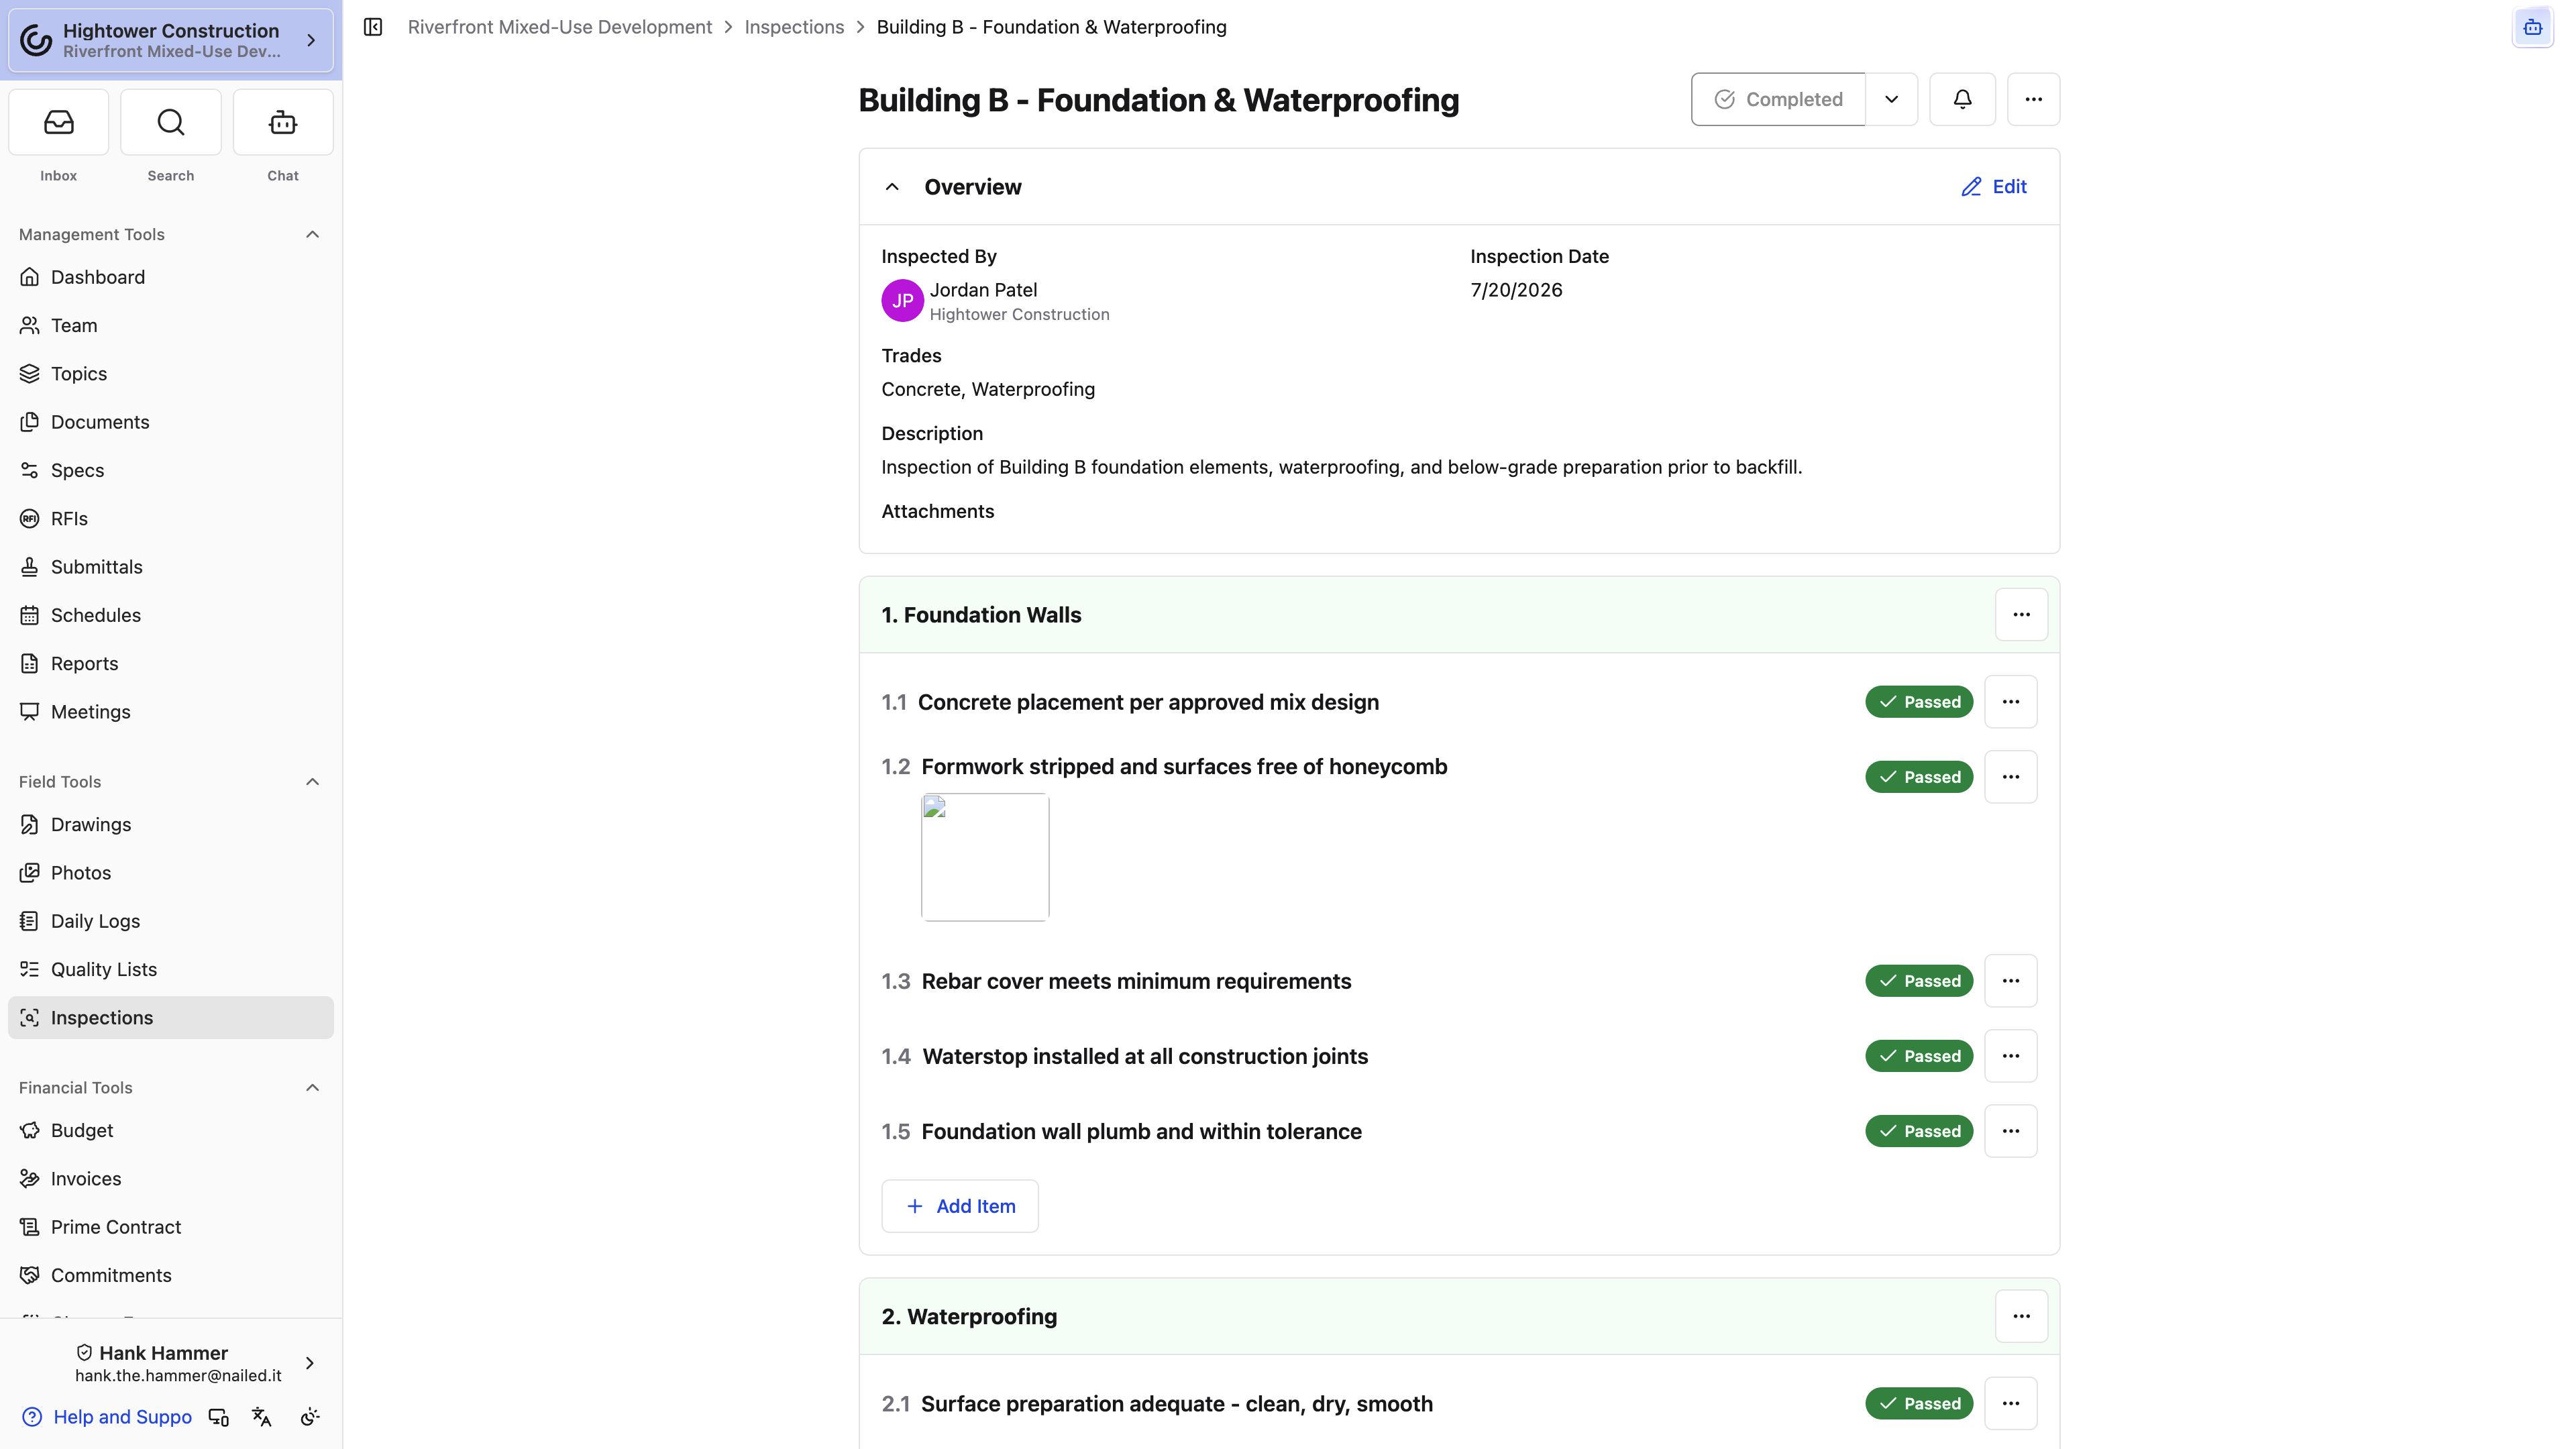
By default each item carries three icon buttons rather than labels. The check mark is Passed, the X is Failed, and the third glyph is Not Applicable. An item with a custom Response type shows that set's answers as labeled buttons instead — Yes and No, say — and each one counts as a pass, a fail, or not applicable behind the scenes. Whichever you tap turns solid, so you can see at a glance which lines are done.
- Tap the check, or a response that counts as a pass, when the criterion is met.
- Tap the X, or a response that counts as a fail, when it isn't. The notes sheet opens on its own so you can explain the failure.
- Tap N/A, or a response that counts as not applicable, when the check doesn't apply here.
- Add observations, notes, photos, or files to the item.
- Leave a result blank only when the check genuinely hasn't been performed yet.
A blank result and an N/A say different things, and the pass rate treats them differently too. Not Applicable comes out of the calculation entirely. A blank stays in it and counts as a miss, so a checklist you never finished reports a worse number than the walk deserved. Spend the extra tap.
Pro Tip: Put general inspection attachments in the overview and item-specific evidence on the item. Keeping them separate is what makes the final PDF easy to follow instead of a pile of photos with no home.
The notes workflow opened by itself. Is that a bug?
No. Marking an item Failed opens it on purpose, because a failure without an explanation is the one result nobody can act on later.
I recorded the wrong result. Can I change it?
Yes, while the inspection is in Inspecting and you have write access. If it's already complete, return it to Inspecting, correct the result, and complete it again.
Work through the list this way and every result on the record arrives with the evidence that justifies it.
Complete, reopen, or correct an inspection
Complete the record after you've checked the entire list and decided how each failure will be handled. Completing turns the walk into the record you'll export and hand off, so it's worth one last read-through first.
- Review every section for blank results.
- Review failed items and their observations.
- Confirm overview details and attachments.
- Select Complete Inspection.
Step 1 is the one that gets skipped, and it's the one that costs you. Blank results stay in the pass-rate denominator, so completing an inspection with three unmarked items publishes a number lower than the walk earned — and everyone scanning the index sees it. Mark them Not Applicable if they didn't apply, or go back and check them.
Note: A completed inspection still shows every result you recorded, as Passed, Failed, and Not Applicable badges — or the response's own label for items with a custom response set. The tappable buttons disappear outside Inspecting, which is why the list looks different once you complete it. Nothing has been lost, and it isn't a permission problem.
Need to fix something? Return the inspection to Inspecting, make the change, and complete it again. You can use the activity area to understand later changes, which is exactly why correcting the record beats quietly working around it.
I completed it before the results were in. What now?
Send it back to Inspecting, finish the items, and complete it again. Everything you already recorded is still there.
Can anyone tell the record changed after it was completed?
Use the activity area on the inspection — that's where later changes are visible.
Complete it deliberately and the exported record matches what actually happened on site.
Export an inspection PDF
When the inspection needs to leave Constructable — for an owner, a subcontractor, or the closeout binder — export it as a PDF. You get a portable record of the overview, checklist, evidence, and results in one file you can share or retain. This works from a phone as well as a desk.
- Open the inspection.
- Open the ⋯ menu.
- Choose Export to PDF.
- Wait for generation and download the file.
The PDF includes status, inspected-by user, date, trades, description, overview attachments, sections, item results, observations, and item photos. Items with a custom response set print the chosen response's label, so the record says "No" where the inspector tapped No. That's a substantial slice of the project in a single file.
Note: Review the PDF for restricted or sensitive content before you distribute it outside Constructable.
Export to PDF isn't in the menu. Why not?
It lives in the inspection's ⋯ menu, so check there first. If it's genuinely absent, confirm you have View inspections; if the inspection or its attachments are still syncing, wait and retry.
The PDF shows the wrong inspector or date.
Both come from the inspection overview, along with trades and the description. Correct the overview and export again.
Export it and the inspection travels as one file that stands on its own.
Delete inspection content
Deletion comes in three sizes here — one item, one section, or the whole inspection — and the safest habit is to remove the smallest thing that fixes the problem. Save deleting the full record for inspections that should leave active use entirely.
- Delete an item to remove one checklist check.
- Delete a section to remove that section and every item in it.
- Choose Delete Inspection from the ⋯ menu to remove the full record.
All three confirmations say the same thing, and it's true: the action can't be undone. There's no archive and no recycle bin. Before you delete anything, read the observations and attachments hanging off it — they're often the only place a field condition was ever written down. Export the PDF first if there's any chance you'll want the record back.
If the problem is a mistake rather than something that has to disappear, rename the inspection or edit the structure instead.
Pro Tip: When the existing record must remain as a reference, duplicate it before making substantial changes and work on the copy.
I only need to remove one check. Do I have to delete the section?
No. Delete the individual item. Deleting a section removes that section and its active items, which is more than you asked for.
Should I delete an inspection or rename it?
Rename or edit when the record is basically right and just mislabeled. Delete only when the entire inspection should leave active use.
Remove the smallest thing that fixes the problem and the project keeps the history it will need later.