Use this guide to capture, organize, review, download, report, and troubleshoot project photos and videos. It covers the exact controls available on desktop web, mobile web, and the native app.
Learn what pending uploads and weak connectivity mean for field capture in Field-Ready Mobile.
Start here
- I take field photos: Create an album and add media → Review photo details.
- I organize project media: Find photos → Copy or move selections.
- I prepare reports: Export photos to PDF.
- Something is missing or blocked: Start with Troubleshooting Photos.
Common task recipes
- Document a site walk: Create a dated album, take or upload photos and videos, then add descriptions to important photos.
- Reuse a photo in another album: Select it and choose Copy to Album... from the ⋯ menu. The original remains where it is.
- Reorganize without duplicates: Select photos inside an album and choose Move to Album... from the ⋯ menu.
- Send a visual report: Select photos in an album or in Photos and export them to PDF with timestamps and descriptions.
Understand access and availability
Understand how Photos works
Every photo in the project lives in an album, and everything else here — searching, selecting, downloading, reporting — is a way of getting back to what's inside one.
Album → uploaded or captured media → timestamp and description → selection → download or PDF
Albums organize your project's photos and videos. Two icon buttons in the Photos header switch between them: Album view browses those collections, and Photo grid view browses media across every album you can access, which is the one you want when you remember the photo but not where it went. Hover either icon to see its name. In either grid, photos are grouped under month headings such as August 2026, using each photo's capture time when it has one.
Copying and moving sound similar and aren't. Copying places a photo in another album without removing its original album context, so the same evidence can live in two collections. Moving changes the photo's album, which is what you want when media simply landed in the wrong place.
Every photo carries a date, and it comes from one of two places. If the file has a capture time in it — which anything shot on a phone does — we use that. If it doesn't, we use the moment the photo was uploaded to Constructable. That second one is not a date from the file, so a photo someone emailed you in March and uploaded in July will read as July.
Note: Daily Log photos have a separate view permission from other project photos, so a teammate can have full access to project Photos and still not see media that came from a Daily Log.
Your organization can also have us burn the capture date, time, and location into photos as they arrive. See Understand stamped photo captions if your photos show a timestamp block in the corner and you're wondering where it came from.
Permissions, visibility, and platform availability
If some photos are visible and others aren't, or the upload button simply isn't there, that's usually access rather than a bug. Photos checks a few separate things.
- View photos, excluding daily log photos controls ordinary project Photos.
- View daily log photos separately controls media associated with Daily Logs.
- Add or remove photos, create photo albums controls album creation, uploads, moves, copies, edits, and deletion.
- Whether you can modify the album itself is also checked before move or delete actions appear, so an action can be missing on one album and present on another.
By default, administrators, managers, and employees receive Photos permissions. Your project may be configured differently, so check with your Admin before assuming something is broken.
With the required access, you can browse, upload, download, organize, and export photos on desktop web, mobile web, and the native app.
- Browsing albums and photos works on desktop web, mobile web, and the app.
- In the app, Add Photos opens Take Photos and Choose Photos so you can shoot straight into an album.
- Desktop adds drag-and-drop uploads and shows the selection toolbar buttons with their labels rather than as icons.
- On a phone, the selection toolbar sits at the bottom of the screen and shows Download, Delete, and a ⋯ menu as icons.
- Select All, Copy to Album..., and Move to Album... live in the ⋯ menu on every screen size, not on the toolbar itself.
- Download works everywhere. In the app it saves the originals to your camera roll; on Android they land in an album called Constructable Downloads.
- Select photos and choose Export to PDF from the ⋯ menu.
- Use the selection toolbar and ⋯ menu to download, copy, move, or delete selected photos on mobile web and in the native app.
Troubleshooting Photos
Nearly every Photos problem is one of three things: a filter you forgot about, an upload that hasn't finished, or a permission that differs from the one you're thinking of. Find your symptom and work down the checks in order.
No photos appear
Start with filters — they're the usual culprit.
- Clear the search and date filters.
- Switch between Albums and Photos.
- Confirm that the photos belong to an album.
- Check ordinary and Daily Log photo permissions, depending on where the media came from.
Upload is unavailable
Confirm you have Add or remove photos, create photo albums and that you can modify the current album. In the app, also allow camera or photo-library access when your device prompts.
If the camera is blocked, the app shows Camera Access Required with Constructable does not have camera access. Allow camera access in Settings to continue. Select Open Settings to jump to the app's system settings, or Cancel to stop. The same dialog appears when Scan QR Code on a list needs the camera.
A recent upload has not appeared
Give the upload time to process and keep the app open until pending media completes, then refresh once connectivity returns. Media that someone else is still uploading may stay hidden until it's ready — that's expected, not a lost file.
Move is missing
Move to Album... appears only while viewing an album you can modify. When you need another copy but should keep the source, use Copy to Album... instead.
PDF export is missing
Enter selection mode, select at least one photo, and open the ⋯ menu to choose Export to PDF. From an album the PDF is titled with the album name; from the cross-album Photos view it's titled All Photos.
A photo date seems wrong
If the file carries a capture time, we use it. If it doesn't, the date you're looking at is the moment the photo was uploaded to Constructable, not anything read out of the file — so anything forwarded to you and uploaded weeks later will read as the upload day. Date filters use whichever of the two the photo ended up with.
Some photos have a stamped timestamp and others don't
Captions are burned in at upload, so only photos that arrived while Date, Time, and Location Captions was switched on carry one. Turning the setting on later doesn't go back and stamp the photos already in the project. See Understand stamped photo captions.
Understand stamped photo captions
Some organizations need every field photo to prove when and where it was taken, without anyone having to remember to say so. Turn on Date, Time, and Location Captions and we burn that information into the bottom corner of each photo as it's uploaded, so it survives being downloaded, emailed, and pasted into someone else's report.
The stamp carries whatever the photo actually recorded:
- Capture date and time with the time zone, as in "Jul 24, 2026 4:18:38 PM PDT"
- The address we resolved for the capture location
- GPS coordinates
A photo missing a capture time doesn't get a caption at all, which is why a screenshot or a scanned document uploaded to an album comes through clean.
To change the setting, an Admin opens Organization Settings, expands Photo Settings, and toggles Date, Time, and Location Captions. It reads Enabled or Disabled, applies to every project in the organization, and covers both project photos and Daily Log photos.
Note: The setting only affects photos uploaded from that point on. Switching it on doesn't stamp your existing library, and switching it off hides captions on photos that already have them rather than deleting the originals — turn it back on and those photos show their captions again.
Can I stamp photos we uploaded last month?
To apply captions to older media, re-upload it while Date, Time, and Location Captions is enabled.
Who can turn captions on or off?
Anyone with Update organization-level settings, which is Admin by default. It's an organization-wide switch, not a per-project or per-user one.
Turn it on before the walk and every photo carries its own proof of when and where it was taken.
Capture and organize
Create an album and add media
Photos pile up fast on a job, and one enormous collection called Site Photos helps nobody. Create an album for a specific field event, area, or reporting period so your team can find the media again later.
Create an album
- Open Photos.
- Select Album in the header. In the app, it's the + button in the top right.
- Enter a unique title.
- Select Create Album.
Pro Tip: Lead the title with the date.
2026-07-24 Level 3 rough-instill means something in a year and it's easy to search for;Site Photosis neither.
Each album title must be unique within the project, so add the date or the area when two collections would otherwise clash.
Add photos and videos
- Open the album.
- Select Add Photos.
- In the app, choose Take Photos to shoot straight into the album, or Choose Photos to pull from your camera roll.
- On web, the Upload Photos & Videos dialog opens — pick files, or drag them onto the album instead.
- Wait for all uploads to complete.
Note: Large videos and weak field connections can take longer than you'd expect, so keep the app open while uploads are pending.
You now have a named place for this walk's media, and a title your team can search for.
Can I put videos in an album?
Yes. Albums hold photos and videos, which is why the web upload dialog is labeled Upload Photos & Videos. Share videos as original files and use still photos in a PDF report.
Can two albums share a title?
No. Each album title must be unique within the project. Adding the date or the area is usually enough to tell two similar collections apart.
Find and browse photos
A project library gets big quickly, and scrolling isn't a search strategy. Use the view, search, and date controls to narrow thousands of photos down to the handful you actually need.
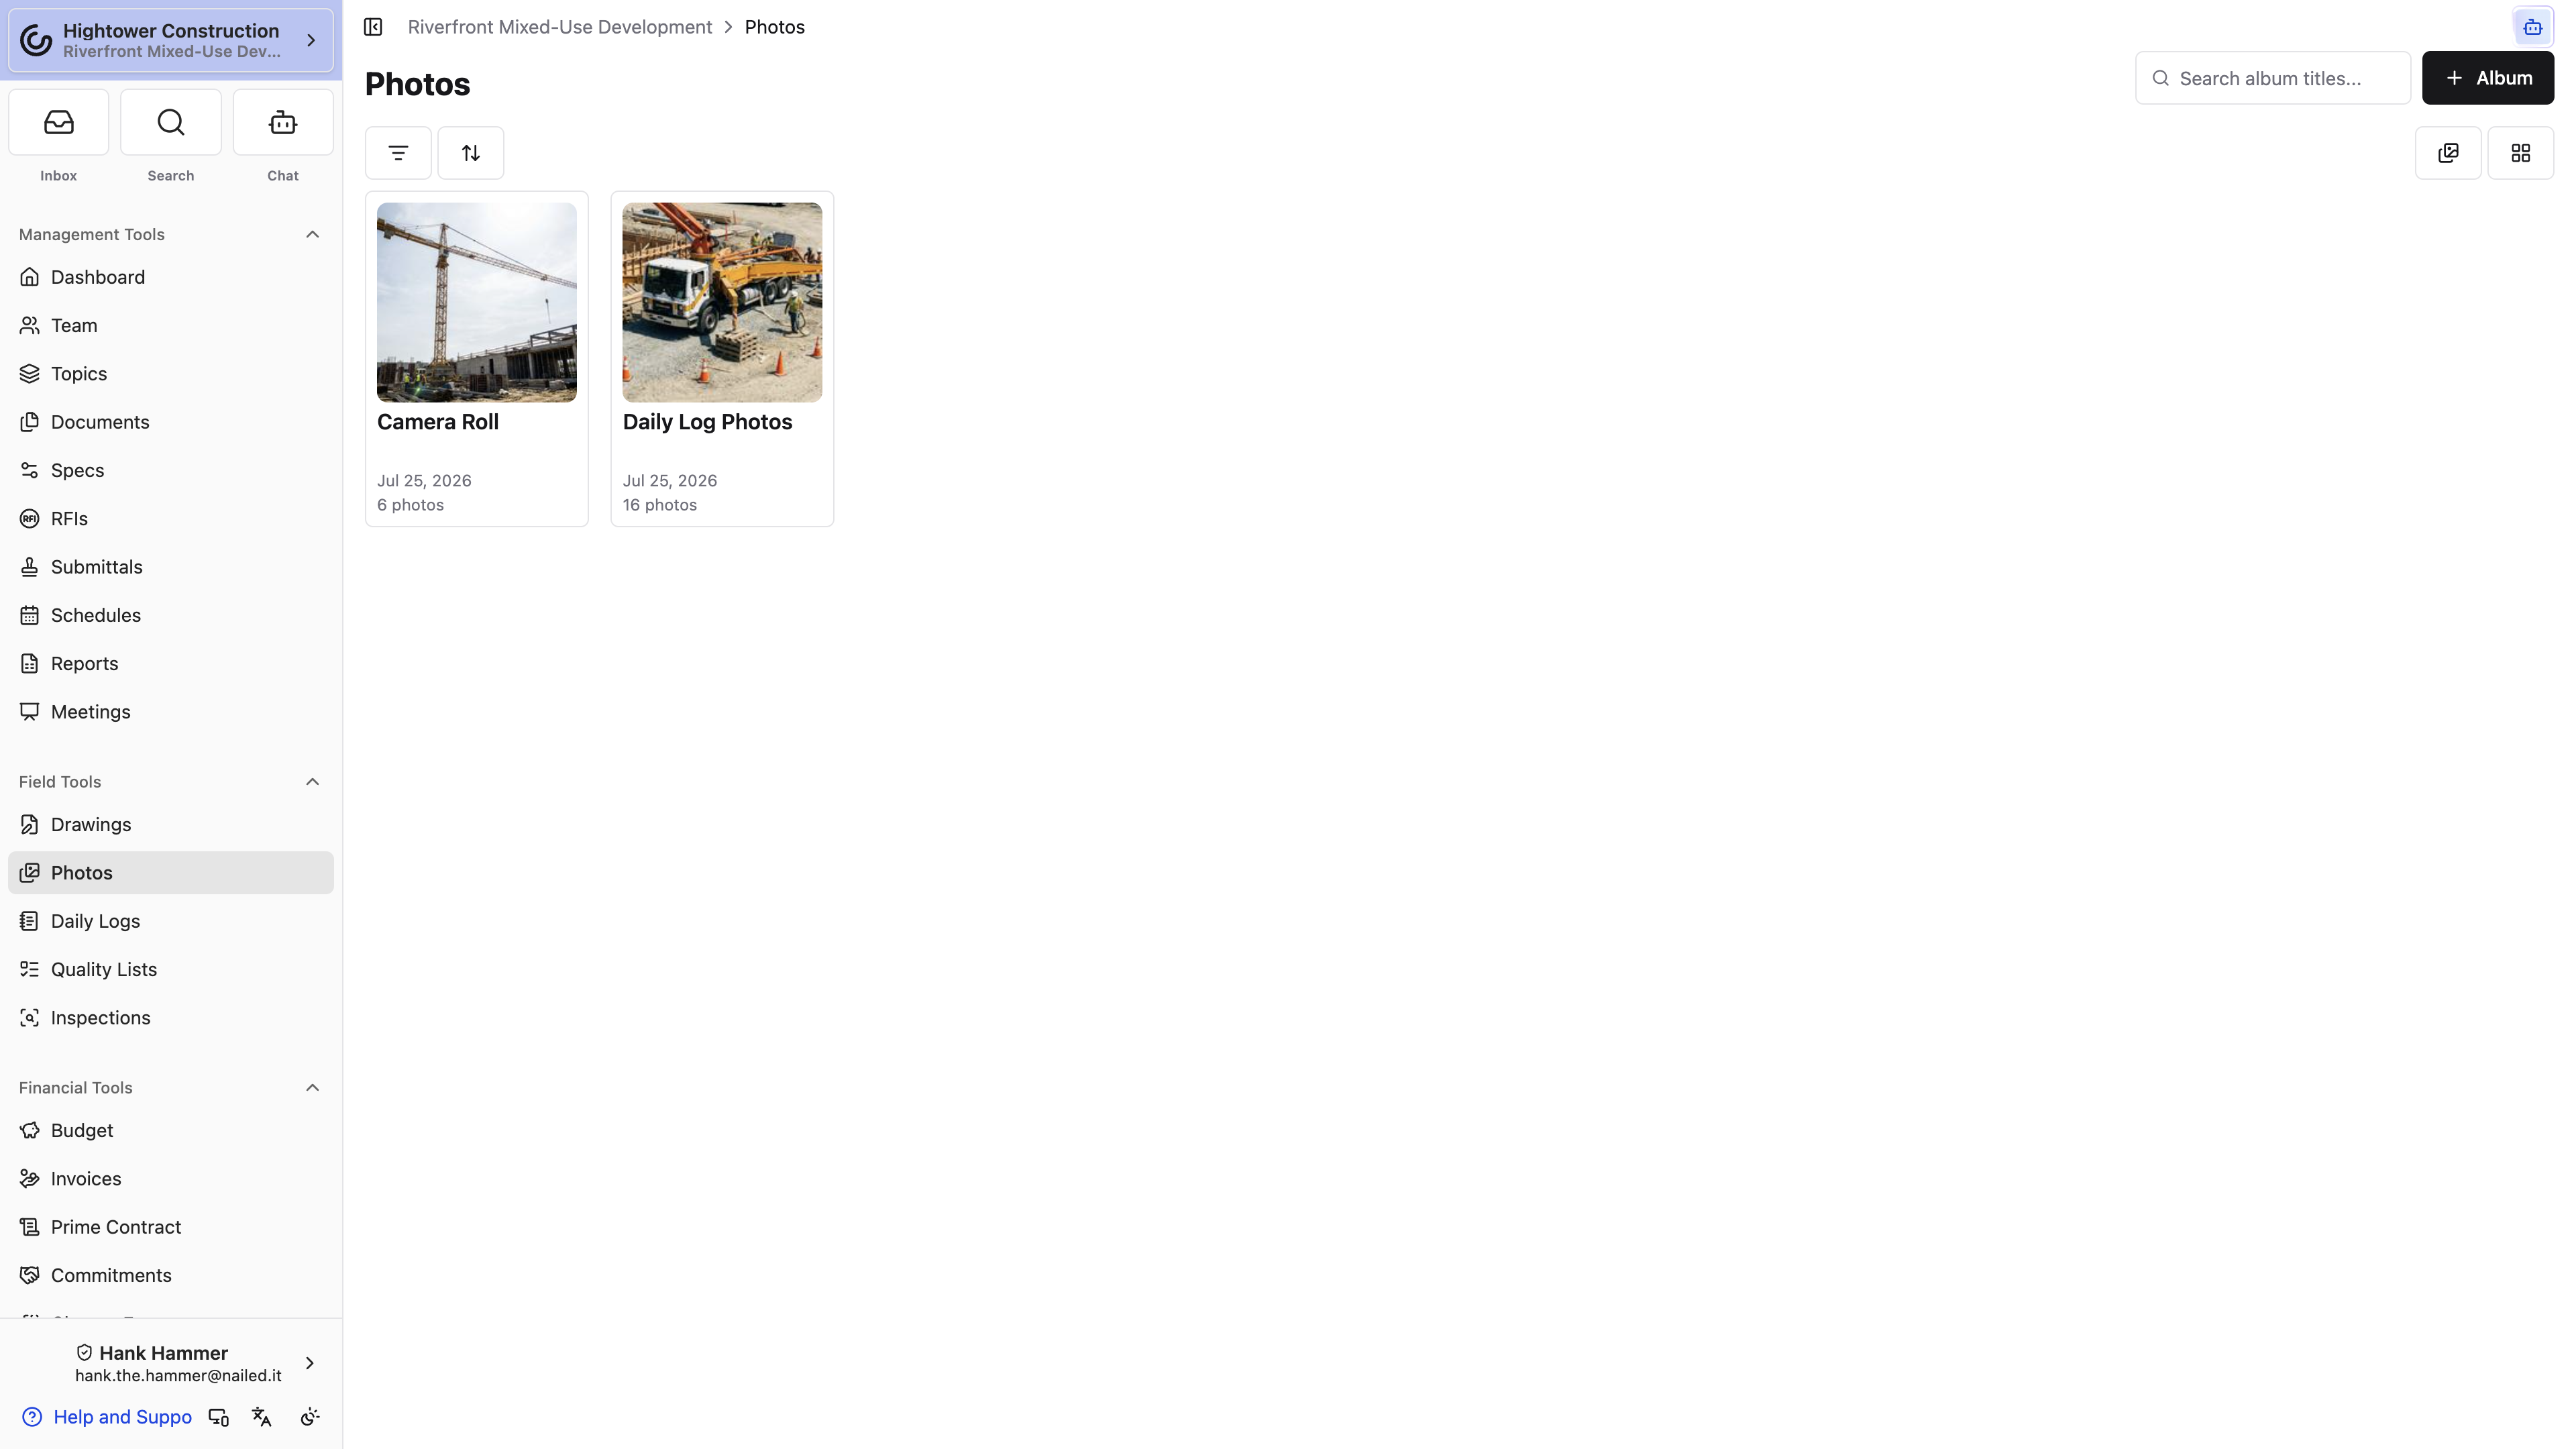
- Choose Albums to search album titles and scan cover photos.
- Choose Photos to browse media across albums.
- Search by album title.
- Set start and end dates to filter on each photo's capture date, or its upload date when the file has no capture time.
- Open an album to focus selection and reporting actions on one collection, or stay in Photos to select across albums.
- Select a photo to open the carousel and move through nearby media.
Note: If you see no results even though the project clearly has media, clear your active filters before assuming anything was deleted. A date range left over from last week's report is the most common cause.
Narrow it down once and the selection, export, and download actions all work on exactly the set you meant.
What's the difference between the Albums and Photos views?
Albums browses collections and searches album titles. Photos browses media across the albums you can access, which is faster when you remember the photo but not where it lives. Both views group photos by month. Export to PDF works from either view on desktop web, mobile web, and the native app.
Why does a photo show a date I don't recognize?
If the file has a capture time in it, we use that. If it doesn't, you're seeing the day the photo was uploaded to Constructable — so a photo shot in March and uploaded in July reads as July.
View and describe photos
Open a photo when you want to inspect it at full size, check its date, or add the context that makes it useful to someone reading it next month.
Use the photo viewer to move through your current filtered group. Add a description that explains what is shown, where it is, and why it matters. Descriptions travel into album PDF exports, so write them for someone who was not on site — "cracked grout, Level 3 east restroom, north wall" beats "grout issue" every time.
Details sit in a side panel on desktop and a pull-up drawer on a phone; More info opens it and Less info collapses it again. More info appears for the photo you're looking at when that item has a full photo record — an attachment that's still syncing, or a file that isn't a photo, won't show it even if other slides in the same carousel do. Inside you'll find Description, Comments with a count, and Sheets when the photo is pinned to a drawing, plus who added the photo and when. The timestamp reads Captured on when the file carried a capture time and Uploaded on when it didn't. Select Start Thread on the Comments tab to open a discussion about the photo.
Photos uploaded from a drawing's Photo pin live in the system-managed Pinned album. When a photo is connected to a drawing, its details include Sheets; open that section to return to the exact sheet and pin location.
Note: An album's notification controls only affect the updates you receive. They don't change who can view or edit its media.
Why is this photo in the Pinned album?
It was uploaded from a Photo pin in the drawing viewer. The album keeps drawing evidence together automatically; use Sheets in the photo details to return to its drawing location.
A described photo is evidence. An undescribed one is a picture of a wall.
Copy, move, and download photos
Selection mode is how you handle a group of photos in one pass — pulling a set into a reporting album, fixing where media landed, or grabbing the original files to hand off.
- Open an album or the Photos view.
- Enter selection mode.
- Select individual photos, or open the ⋯ menu and choose Select All.
- Choose an action:
- Download, on the toolbar itself, saves the original files. On desktop, up to ten photos download as individual files named from the capture time, and anything larger arrives as a single ZIP with a progress toast while it zips. In the app, they go to your camera roll — on Android, into an album called Constructable Downloads.
- Copy to Album..., in the ⋯ menu, adds the selected photos to another album and leaves them in this one too.
- Move to Album..., also in the ⋯ menu, relocates them. It appears only while you're in an album you can modify.
On a phone the toolbar sits at the bottom of the screen and its buttons are icons rather than words: a download arrow, a trash can, and ⋯.
Choose copy when the same evidence belongs in two collections. Choose move when you are correcting how media is organized.
Note: Before moving a large selection, double-check the destination. Move changes where the photos live, so a wrong pick means finding them again in an album nobody expected.
Your media now sits where the next person will look for it.
Should I copy or move?
Copy when the same photo genuinely belongs in two places — it stays in its original album as well. Move when the media is simply in the wrong album and you don't want a duplicate.
Why can't I download on my phone?
Use Download on the phone toolbar; in the app it saves the originals to your camera roll. For a report, select photos and choose Export to PDF from the ⋯ menu.
Why is Move to Album missing?
Move to Album... only appears while you're viewing an album you can modify. From a cross-album view, or on an album you can't modify, use Copy to Album... instead.
Report and remove
Export photos to PDF
A photo PDF turns selected photos into a visual record you can email or file. Use Export to PDF on desktop web, mobile web, or the native app.
- Open an album or the cross-album Photos view.
- Enter selection mode.
- Select one or more photos.
- Open the ⋯ menu and choose Export to PDF.
- Wait for the PDF to generate and download.
From an album, the PDF uses the album title. From Photos, it's titled All Photos. Either way it arranges your selected photos in a report layout.
Note: Select at least one photo before choosing Export to PDF. It is available from both an album and the cross-album Photos view.
Pro Tip: Add descriptions before you export rather than after. They come through in the PDF, and they're the difference between a page of photos and a report someone can act on.
You now have a self-contained record for a reader who will never log in.
Do videos come through in the PDF?
Export still photos in the PDF and share the original video files separately.
Why isn't Export to PDF available?
Enter selection mode and select at least one photo, from an album or from Photos, then open the ⋯ menu and choose Export to PDF.
Delete photos or an album
Deleting an album takes every photo in it along too, so it's worth a second look before you confirm. Decide first whether you mean to remove individual media or the entire collection.
Delete selected photos
- Open the album.
- Enter selection mode.
- Select the media.
- Choose Delete and confirm.
To remove a single photo while you're looking at it, use Delete photo in the viewer. The confirmation says it plainly: "Are you sure you want to delete this photo? This action cannot be undone."
Delete an album
Open the album menu, choose Delete, and confirm.
Note: Deleting an album deletes every photo in it. There is no undo and no trash to fish them back out of, so download the originals first if the media matters.
Most of the time there's a smaller fix. If only the album title is wrong, edit it. If the media belongs somewhere else, move it instead of deleting the album.
Cleaned up this way, the library gets shorter without losing anything you'll want back.